

Compost T.L.C.
Whip your counter-top compost into shape in just 1 (maybe 2) step(s)!
Sludge, we don’t want no sludge…
Smelly, slimy, if this describes your compost, then it’s time for a little TLC. Stinky compost is not only unpleasant, it creates an inferior finished product for our farmers. Nitrogen, the stuff that helps plants grow, is volatile. It can leach from compost (liquid in the bottom of your bucket?) and float away as a gas (think: stink). If you want the science you can read more here but you don’t have to geek out to keep a balanced bucket. Just implement 1 —maybe 2—step(s) and you’ll be building healthy compost in no time!
Step 1
Just Add “Browns!”
In compost parlance, “greens” are nitrogen rich materials. These are often wet and if you leave them out, they’ll get stinky: lettuce leaves, coffee grounds, meat. These are the compost heavy hitters, and when broken down correctly, they will make finished compost nitrogen-rich. But too much “green” will make a stinky, slimy compost pile—and much of the valuable nitrogen will soon be lost.
Adding carbon-rich “browns” to your pile solves this problem! Browns are the dry materials that have little odor, like shredded paper, straw, dry leaves, sawdust. On their own, browns break down very slowly. When greens and browns are combined, the nitrogen in the greens gets busy breaking down the carbon in the browns. The nitrogen is then “bound up.” It’s stable and even transportable. It can be brought to the farmers’ market compost hub and transported to a farm. Months later, when the greens and browns together have broken down into to compost, this nitrogen (which might have otherwise been a stinky nuisance) will be available to plants.
Aim for a 4-1 ratio of browns-to-greens. You might find, that despite adding more materials, your compost becomes less bulky. If so, the composting process has begun in your very own bucket.
Step 2
Increase the Air!
Free air space (or FAS), is essential to healthy compost. Without it, the microorganisms that convert organic matter to compost will die. NEVER seal your compost container (unless you’re using the Bokashi method). If you’re using a homemade compost container and find the scraps unsightly, take a lesson from the manufactured buckets which come with holes in their lids (fitted with carbon pads as a barrier to bugs and smells).
If you’re adding browns to your pile at a 4-1 ration and your composted is ventilated, you’re probably in the clear. If your compost is still stinky, give it a stir, or a shake. Grab a stick and poke a couple holds. Increase the air, and your compost, will be Crazysexycool.

Aubrey Yarbrough is the Community Development Manager for Farmer Mark. Before moving to LA she ran her own organic farm and cooked on the garde manger station of the award winning Elements restaurant in Princeton, NJ. She has contributed poetry to New American Writing and prose to Mondoweiss and Edible Jersey.

#HealthierAtHome
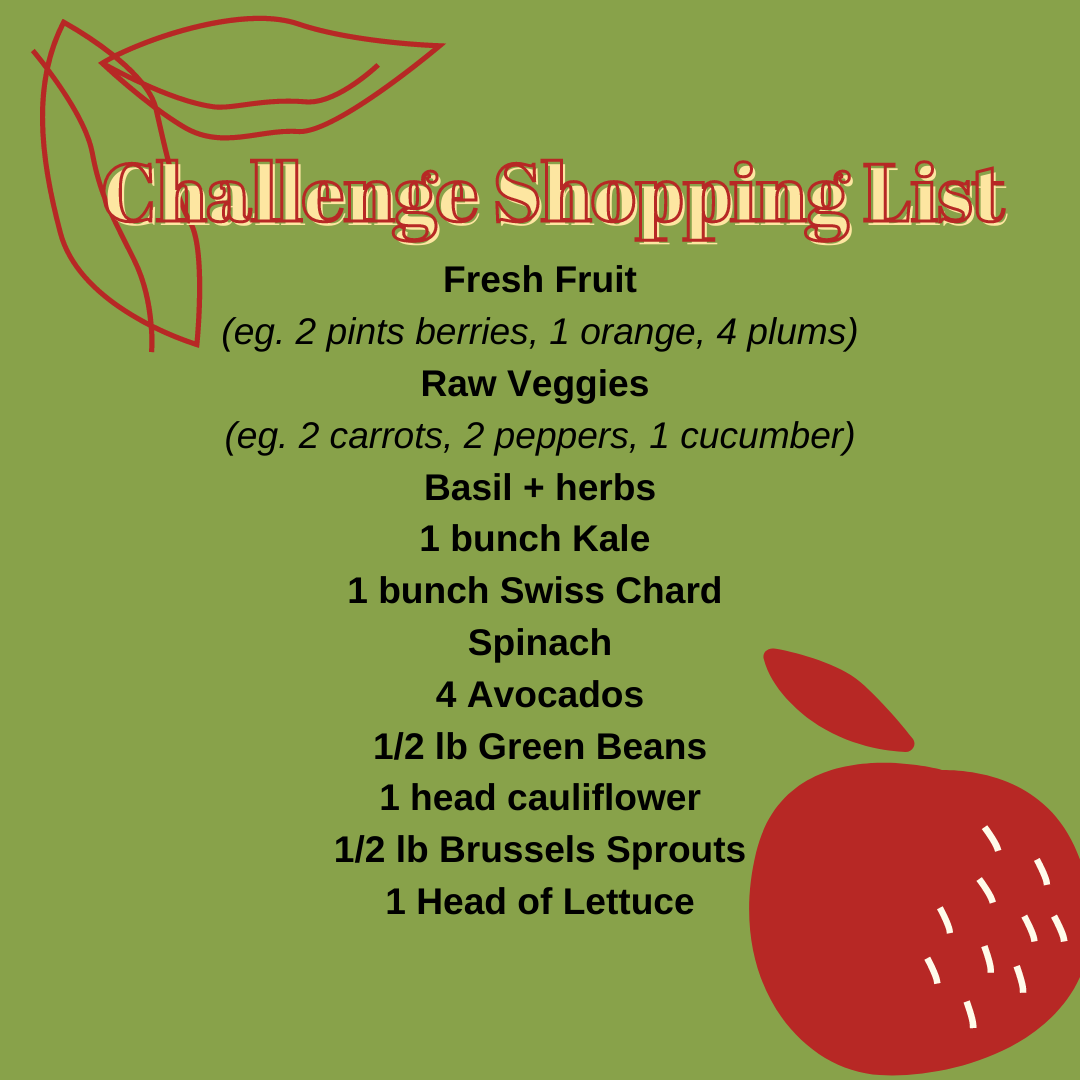
Sprouts of Promise and our Playa Vista Farmers’ Market have cooked up a week-long challenge! Many of us have been spending more time at home than ever before. This challenge is designed to get you eating mindfully and moving often (and there are healthy GIVEAWAYS to help you along).
Sprouts of Promise and our Playa Vista Farmers’ Market have cooked up a week-long challenge! Many of us have been spending more time at home than ever before. This challenge is designed to get you eating mindfully and moving often (and there are healthy GIVEAWAYS to help you along). This shopping list is all you need to participate! Follow @sproutsofpromise on Instagram for the daily challenges!
The Second Sexiest Vegetable
It’s time to give cabbage her due! This denizen of the crisper, relegated to garnishes and pickling projects, is going main course. Why? Because nutrient-dense cabbage is as delicious as she is beautiful. And (duh) St. Patty’s Day!
It's raining again. And as long as we ignore the Instagram posts of snow and single-digit thermometer readings from the midwest, we Southern Californians can lament our long, cold winter. So crank up the oven: it's time for winter-veggie comfort food, starting with cabbage!

Admittedly, cabbage has a PR problem. Unlike her popular cousins kale and Brussels sprouts, cabbage is associated with an older crowd and — tragically — the word boiled. In fact, cabbage’s image has fallen to such depths, she’s now eligible to be considered ironic. Herein lies her comeback. Like the beets of yore, cabbage is waiting to be rediscovered. She’s also beautiful, delicious, and super great for you.
Buttery when roasted, crisp when pickled, and far more forgiving than Brussels sprouts, cabbage would be worthy of your attention even if she wasn’t a nutrition powerhouse. But she is. Here’s a nutrition rundown:

Cabbage has:
Cancer fighting glucosinolates
Antioxidant, anti-inflammatory and antibacterial properties
An insanely low caloric load
Vitamins C, E, K, A, fiber, folate, iron and magnesium
Let the cabbage-craze commence! These quick and delicious steaks are a mouth-watering place to start.
Cabbage Steaks Recipe

Makes 4 steaks
Ingredients:
1 Medium Cabbage
Grass-fed butter (I like Straus because it's made in the European style with a higher butterfat content)
Sprig of thyme
Salt and pepper
Instructions:
Pre heat oven to 400F
Slice your cabbage into 1/2” steaks
Lightly butter a casserole dish and place it in the warming oven
Melt 2 Tbs of butter in a cast iron pan over medium heat.
Place a single cabbage steak in your pan. Rub it around until it's generously coated with butter, let cook one minute, then flip and repeat on the other side. Transfer steak to your pre-warmed casserole dish (out of the oven). Repeat with the rest of your cabbage, adding butter often, and adjusting the temp so your butter doesn’t burn. When your casserole is lined with a single layer of cabbage steaks, sprinkle with salt and pepper, drop a couple sprigs of thyme on top, and stick it in the oven. Roast in oven for 15 minutes, then flip steaks and roast for another 5-10 minutes or until the steak is browned on both sides and the cabbage has the consistency of melted heaven.


Now taste.
I know what you're thinking. You've fallen head over heels in love with cabbage, and now you're afraid the weather is going to warm up and leave you longing. Here’s a secret: it’s good raw too. This sophisticated coleslaw recipe will carry you into spring. In addition to being sexy, cabbage is versatile.


Aubrey Yarbrough is the Community Development Manager for Farmer Mark. Before moving to LA she ran her own organic farm and cooked on the garde manger station of the award winning Elements restaurant in Princeton, NJ. She has contributed poetry to New American Writing and prose to Edible Jersey.
3 Eco-friendly DIY Cleaning Products
When the subject of cleaning products comes up, I always think of harsh smells and scary chemicals. Why have we humans created so many unnatural products? Oh yeah, because they get the job done. But our solutions to the messes of grimy sinks and streaked windows spell trouble for our bodies and the environment.
Did you know that only 1% of toxins are listed on labels? In the US, many products are not required to disclosing their ingredients. And many of the chemicals in ordinary household cleaning solutions are difficult for our bodies to eliminate. Some, like dibutyl phthalate, 2-butoxyethanol, glycol ethers, perchloroethylene and formaldehyde, have been linked to cancer, hormone disruption, birth defects, respiratory disease and more. And it’s not only human health that’s affected, these products also take a toll on the earth. 90% of our cleaning products are not biodegradable or recyclable.
But there’s hope! Natural cleaning products are safe and they work! Below I’ve listed 3 recipes for natural cleaning product are easy to make and 100% safe.
Window\Mirror Cleaner: Toilet Cleaning Powder:
¼ cup rubbing alcohol 1 cup baking soda
¼ cup vinegar ¼ cup citric acid
1 tablespoon cornstarch 10 drops lemon essential oil
15 drops lemon 10 drops lavender essential oil
Empty spray bottle 10 drops eucalyptus essential oil
Shake before each use. Store in air-tight container
Liquid Hand/Dish Soap:
½ cup unscented castile soap

2 cups water
10 drops eucalyptus essential oil
10 drops lemon essential oil
Old soap dispenser

Portuguese Bread Soup
Few dishes are simultaneously comforting and fancy, nutritious and easy to make. Portuguese Bread Soup hits all the marks.
Few dishes are simultaneously comforting and fancy, nutritious and easy to make. Portuguese Bread Soup hits all the marks. Sure the recipe starts by frying sourdough bread in olive oil—but the rest of it is greens, beans and garlic, and a poached egg.
It is quite filling, and works best as a simple, stand-alone meal. I like to serve it on those rare occasions when friends come over for lunch. It is my go-to dinner for overnight guests arriving late.
I adapted this soup from a recipe found in Taste Magazine. The text below is pulled from Taste almost verbatim, with a few minor edits.

Ingredients
2 C country-style sourdough bread, torn into irregular, 1 inch cubes
3/4 C extra virgin olive oil
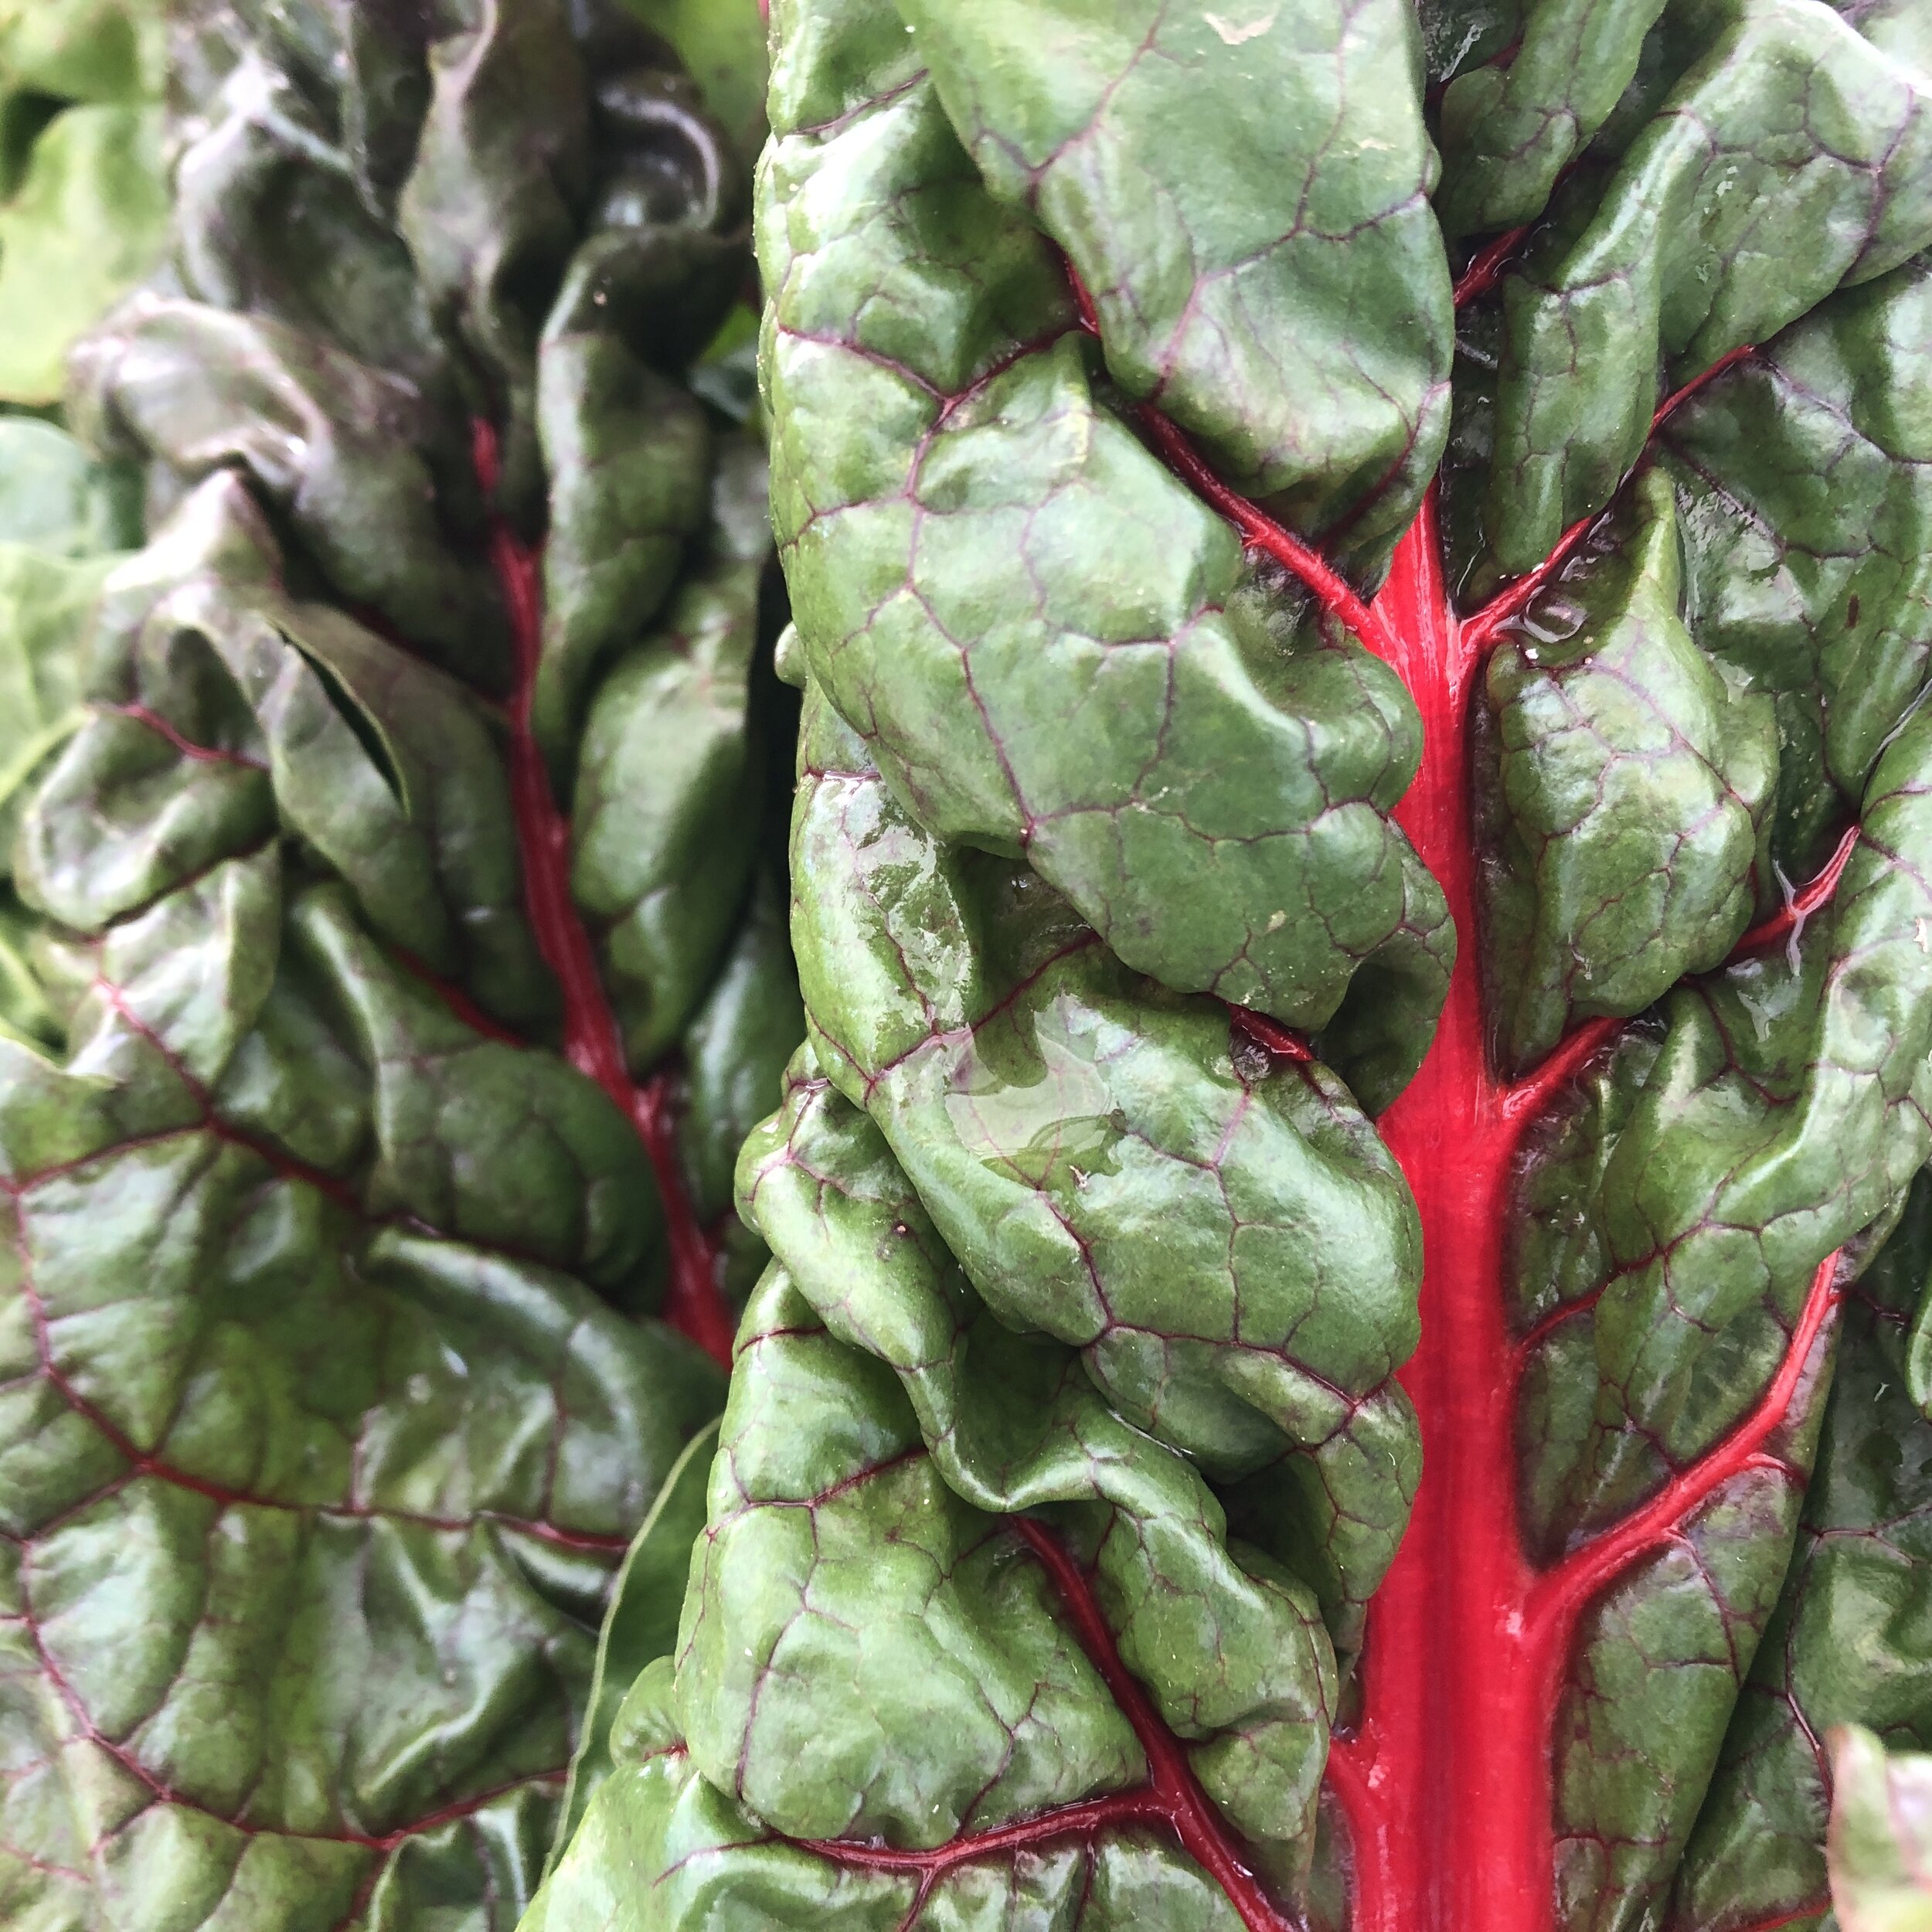
1 bunch Swiss Chard (leaves & stems separated, leaves torn, stems chopped)
1/2 white onion, diced
1 bunch cilantro
1 clove garlic
4 C chicken stock (can substitute veg stock)
1 C dried white beans (can substitute canned)
4 free-range eggs
salt & pepper
Instructions
1
If using dried beans: soak beans a minimum of four hours or overnight. Slow boil in stock or water until beans are tender.
2
Heat ¼ cup olive oil in a heavy skillet over medium-low heat. Add the bread and cook, stirring often, taking care not to burn. When bread begins to brown, about 5 minutes, remove from skillet and wipe skillet clean.
3
Add a tablespoon of olive oil to the skillet and warm over medium heat. Add the chard stems and onion and cook, stirring occasionally, until almost tender, about 5 minutes. Add chard leaves and cook, stirring occasionally, until both the leaves and stems are tender, another few minutes. Season with salt and pepper.
4
Add the cilantro, garlic and 1/2 cup olive oil, and 1/2 cup of chicken stock to a blender. Puree until smooth and season with salt.
5
Add the stock to a pot over medium heat, along with the chard and drained beans. Meanwhile, bring a shallow pot of water to a boil then reduce to the lowest temperature possible. While using a spoon to create a gentle whirlpool, crack each of the eggs into the water, one at a time. Cook until the whites are set and the yolks are still jiggly, 4 minutes.
6
Add the cilantro puree to the stock, chard and beans and stir. Taste and season with salt and pepper. Divide the bread between four bowls, and do the same with the soup base itself. Top each bowl with a poached egg and serve.
7-Step Guide to the Perfect Cheese Board
PSA to all my fellow cheese connoisseurs! The holidays are the perfect time of year to show off your cheese board skills at parties and indulge in an endless amount of cheese cuts. I made a beeline for Stepladder Creamery on my recent trip to the Playa Vista Farmer’s Market. All of their cheeses are creamy and bursting with flavor. I asked the vendor for some tips on creating the perfect cheese board spread. Wines included.
Here is a 7 step guide to the perfect board:

#1- Pick your cheese board base
🔹 cutting boards, pizza boards, baking sheets
#2- Pick your cheese & start to arrange them
🔹combination of 3 (2 hard 1 soft)
#3- Add charcuterie and nuts

🔹Arnette Farms has dried fruit and jams!
#4- Add a salty option
🔹olives, pickles, peppers
#5- add crackers and breads
🔹 Natural Combo, Bake Shack, Boule de pain has assorted crackers\breads
#6- Add sweet fruit & Honey
🔹Berries and grapes are tasty. LSG's Buckwheat honey is sweet and bitter
#7- Choose your wine

🔹merlot, Cabernet, Sauvignon, dessert wines

Hillary Michelle is a social media intern with the Playa Vista Farmers’ Market. She is super passionate about the arts, climate change and is on the hunt for the perfect cheeseboard. She hopes to inspire positive change for the planet’s future.

Christmas in a Jar
Arnett’s Winter Plum Jam is Christmas in a jar. It's sweet, it’s spiced, and it deserves a spot on your holiday table. (And what better place than inside a Christmas cookie?)
Arnett's Winter Plum Jam is Christmas in a jar. It's sweet, it’s spiced, and it deserves a spot on your holiday table. What better place than inside a Christmas cookie?

We took a traditional linzer cookie and added plum jam for a very merry treat! The dough of linzer cookies isn't too sweet, so the jam takes center stage!
Whats more, these fancy little cookies are quite easy to make.
This recipe is modified from NYTimes Cooking
INGREDIENTS
3 cups all-purpose flour
1 cup raw, skin-on almonds (or 3/4 cup almond flour)
1 ½ teaspoons ground cinnamon
1 teaspoon baking powder
1 teaspoon kosher salt
1 ½ cups unsalted butter (3 sticks)
1 ¼ cups granulated sugar
2 large eggs
1 teaspoon vanilla extract
1 cup Winter Plum jam
Powdered sugar, for dusting


PREPARATION
Pulse together flour and almonds in a food processor until the almonds are very finely ground. Add cinnamon, baking powder and salt, and pulse to blend. (Alternatively, whisk together flour, ground almonds or almond flour, cinnamon, baking powder and salt in a large bowl.)
Using an electric mixer, beat butter and sugar together on medium-high until the mixture is light, fluffy and pale, 2 to 3 minutes. Scrape down the sides of the bowl and add in eggs, 1 at a time, beating well after each addition. Add vanilla extract, and beat until everything is well combined, again stopping to scrape down bowl as necessary.
Add in dry ingredients all at once and mix on low speed, just until incorporated.
Divide dough in 2 equal pieces, and wrap each piece in cling film, patting into a 1-inch-thick disk. Chill at least 2 hours, up to 5 days ahead.
Heat oven to 325 degrees. Working with 1 disk at a time, roll out the dough between 2 sheets of parchment paper so it's about 1/8 inch thick. (Because of the almonds, the dough may crack in places while you’re rolling it out. This is O.K., just patch it up with scraps.)
Using a round cookie cutter 2 1/2 inches in diameter, cut out as many circles as possible. Take half of these circles and cut out a 1-inch circle from the interior of the larger circles, creating a doughnut shape that will become the top of the cookie. If at any point the dough becomes too soft to cut and cleanly remove from parchment paper, slide it onto a cookie sheet and chill for a few minutes in the freezer or refrigerator. Gather any scraps of dough, combine them and roll them out, chilling as necessary. Transfer dough circles to a parchment-lined baking sheet spaced 1 inch apart and bake until the edges are golden brown, 12 to 15 minutes.
To assemble the linzer cookies, spread about a teaspoon of Winter Plum jam onto the flat sides of the larger circles. Dust the tops of the cutout circles with powdered sugar and place on top of Winter Plum jam

Fall into Fall!
With local apples and these step-by-step instructions, anyone can make the perfect fall galette!


Hillary Michelle is a social media intern with the Playa Vista farmers market. She is super passionate about the arts, climate change and is on the hunt for the perfect cheeseboard. She hopes to inspire positive change for the planet’s future.
We’re creeping toward November and everywhere I look I see signs of an outbreak. Everyone has Autumn Fever! We all know the causes: excitement for the holidays, changing leaves, and most importantly the food! An amazing array of fruits and veggies are harvested in the fall. The bounties of summer and winter collide and tables at farmers’ markets are full! In frost zones, plants like carrots and kale convert some of their starches to sugars to better survive cold temperatures, and the result is delicious. It’s not your imagination—food actually tastes better in the fall!
If you’re lucky enough to fill your basket with locally grown produce from a farmer’s market, you have officially hit the jackpot. Nothing is sweeter than biting into a crisp apple handpicked from the orchard.
Operating for more than 103 years, Arnett Farms has perfected their crop of apples. Their stand was my first stop at the Playa Vista market last weekend. Their baskets of red and green and yellow fruit caught my eye, and I couldn’t help but think of this of this recipe.
This Galette recipe is both beautiful and delicious. Your guests will brag about you never guessing how simple it is to make!
Ingredients:
2 lbs. apples {pink lady, honey crisp, Granny Smith}- scrubbed, cored and thinly sliced
1/3 cup granulated sugar
1 tablespoon organic, (non-GMO) cornstarch
2 teaspoon lemon juice
¼ teaspoon salt
1 large egg {lightly beaten}
Turbinado sugar
1 14. Ounce refrigerated pie crust
Directions:
Pre-heat oven to 375
In Medium bowl combine apples, sugar, cornstarch, lemon juice, and salt
Place parchment paper on large baking sheet
Unroll pie crust on parchment
Arrange apple mixture in center of pie crust, spread evenly. Overlapping if desired- {leave 3-inch border}
Fold edges of dough up and over fruit
Stir egg with1 teaspoon water
Brush on edges of dough
Sprinkle dough with turbinado sugar
Bake 45-50 minutes, rotating pan halfway through {deep golden brown, apples soft, juices bubbling}
Bon Appetite!


5 Dishes to Cook before Summer's End...
If you haven’t made these recipes, you haven’t TASTED SUMMER. Here are 5 dishes you absolutely must make before summer’s end.
It’s Labor Day weekend! School is back in session, traffic is nuts and summer is winding down. Whether you’re ready to embrace fall, or you’re panicking because you didn’t get-in enough beach days, here are 5 dishes you absolutely must eat before summer’s end.

Salmorejo is gazpacho’s richer, smoother cousin. Like gazpacho, this is a chilled Spanish soup made with tomatoes—and that’s where the similarities end. The tomatoes in Salmorejo steep in hot water with onions, garlic and toasted bread, resulting in a soup that is not raw, but not quite cooked, and this in-between state tastes amazing. The soup get’s its orange color not from red peppers —a common misconception—but from blending in a steady stream of olive oil on high speed until it emulsifies. Trust us, this is a dish you’ll want to serve to your fanciest friends. (And you might as well print out the recipe, because they’re going to ask for it). Best of all it’s EASY!

What is summer without Ratatouille? There are legions of ratatouille recipes on the web, some claiming that each ingredient must be sautéed separately, others advocating for roasting everything together in the oven. The truth is, when you’re working with farmers’ market eggplant and just-off-the-vine tomatoes, your result is bound to taste delicious… but will it taste like authentic ratatouille? That is the question. This recipe is très Provençal. It calls for sautéing each ingredients individually (worth the effort), and it goes a step further by having you chop the veggies into small dice. The results in a robust ratatouille that’s never water-logged. If you close your eyes while eating this, you just might imagine that you’re on a stone porch overlooking a lavender field.
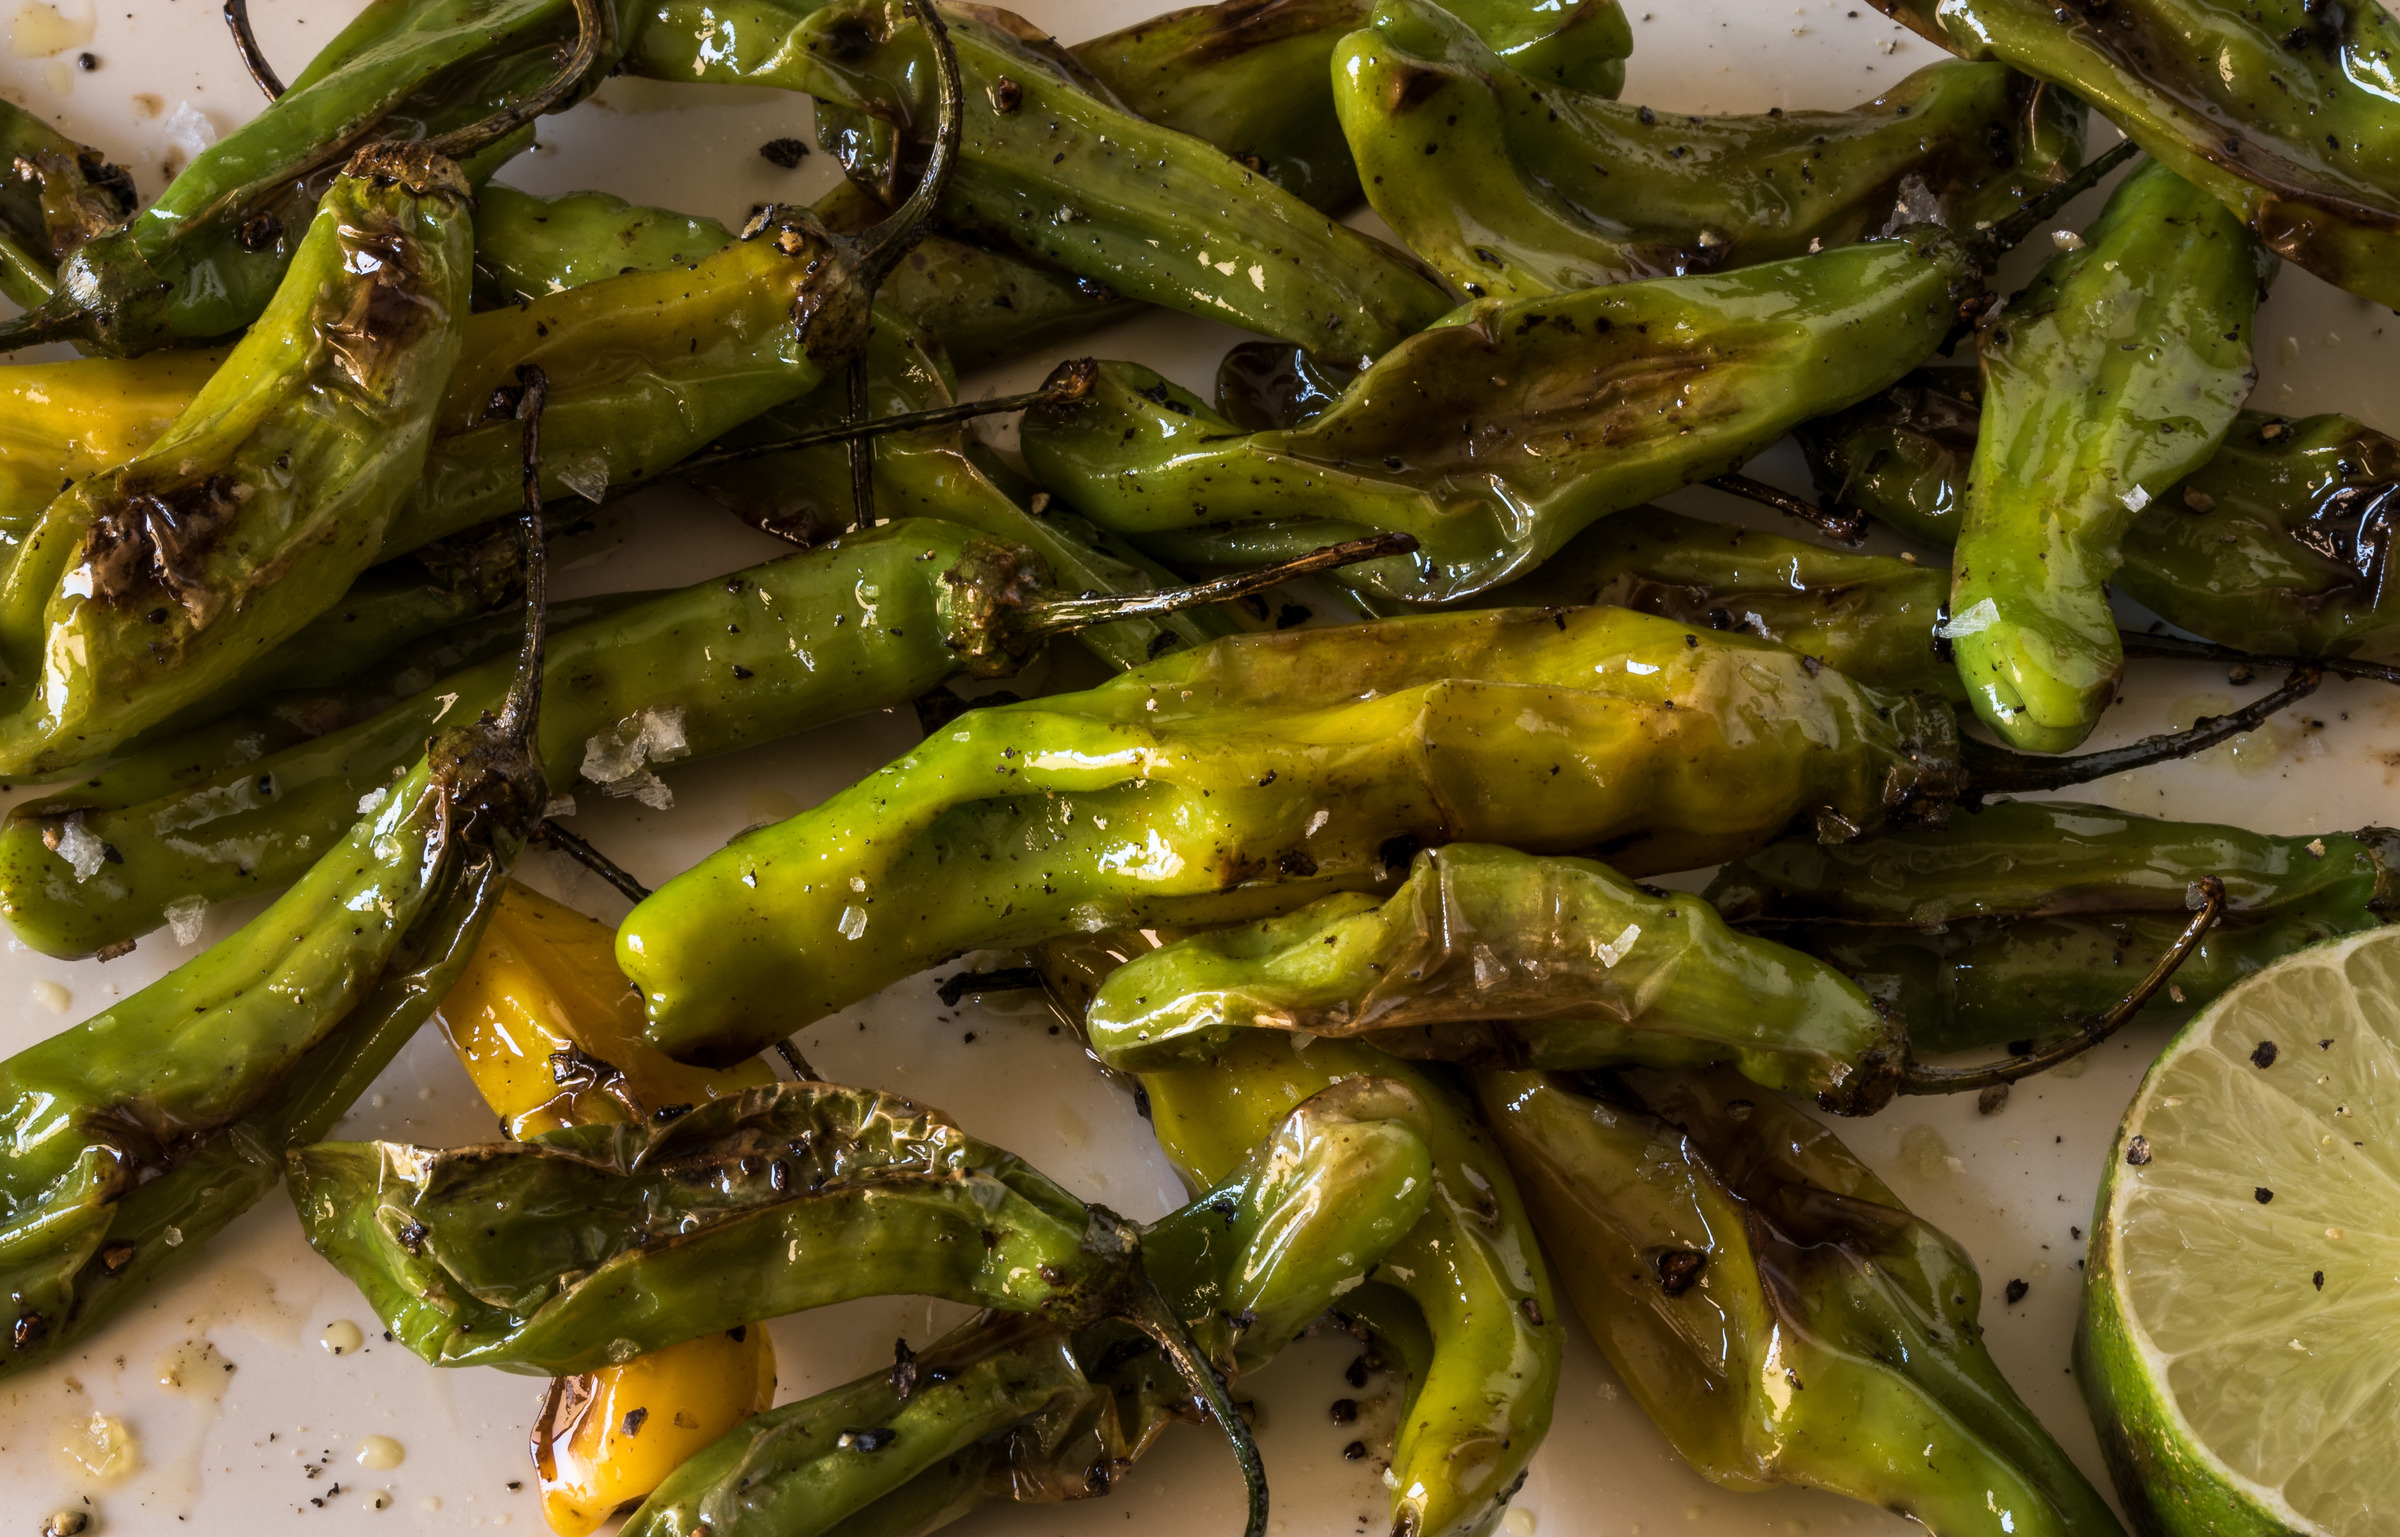
Blistered Shishito peppers are the perfect late-summer accompaniment to your aperitif. And if they take longer than 5 minutes to prepare, you’re doing something wrong. Shishitos are perfect pan blistered with crunchy salt — but are easy to dress up with a pinch of Aleppo pepper and a squeeze of lime.

Caponata is Sicily’s answer to ratatouille. It’s sweeter, richer, and more complex, with a splashes of vinegar, pinch of sugar and handful of capers. Caponata recipes, one to the next, can vary widely — but I’ve never met one I didn’t like. This recipe calls for red or white wine vinegar, I recommend going with a good sherry vinegar instead. And don’t even think about leaving the celery out.

Poulet au Pastis is the rare French dishes that tastes exquisite and turns out to be simple to make. Fresh fennel, pasture-raised chicken and local tomatoes put this simple chicken soup over-the-top. It’s easy enough to cook for your family, and tasty enough to cook for friends. Note: this dish assumes you are purchasing very small Provençal chickens. If you’re in the US — one will certainly do. Any anisette can sub for pastis: Pernod, absinthe, etc. (but don’t use sambuca, it’s sweet).

Aubrey Yarbrough is the Community Development Manager for Farmer Mark. Before moving to LA she ran her own organic farm and cooked on the garde manger station of the award winning Elements restaurant in Princeton, NJ. She has contributed poetry to New American Writing and prose to Edible Jersey.
10 Expert Meal-Prep Tips
Planning ahead can help us eat the nutritious foods that make up our best intentions (and steer clear of empty calories). Here are 10 expert meal-prep tips recommended by chefs and nutritionists!

Planning ahead can help us eat the nutritious foods that make up our best intentions (and steer clear of empty calories). Here are 10 expert meal-prep tips recommended by chefs and nutritionists!
1. Invest in air-tight storage containers (wide-mouth ball jars are cheap and work great).
2. Plan a weekly menu. Pick three meals & shop for them in advance. Smart planning makes for smart meal prepping.
3. Cook grains and beans in bulk! Tinned cans not only create waste, but most are lined with plastic. Throw a pot of beans on the stove & they'll be to use in salads, soups and dips all week long! Quinoa and brown rice can be frozen in ball jars for home-made, zero-waste minute-rice.
4. Roast veggies in bulk. Market beets for salad, fresh eggplant for pasta, and baby potatoes for a side dish can all go in the oven together!
5. Sauce making Sundays! Pesto, salad dressing, mayo, and marinara are so much better when they're homemade. By dedicating a Sunday afternoon sauce hour, you'll have them ready to use all week long.
6. Stock. Stock makes everything better. It adds nutrients and flavor, takes very little (active) cooking time, and it's made from food scraps. Start a stock bag in your freezer and add bones, carrot stems, left-over celery -- everything that won't last. Twice a month slowly boil the scraps in a pot of water & you'll never use a bouillon cube again!
7. Love leftovers! With a “cook once, eat twice” mindset, you’ll get more bang for your meal-prep buck!
8. Prep multi-use ingredients. Hummus can be an after-school snack, a sandwich spread, or eaten with eggs on toast. Beans are a base for chili, a topping for salad, a side dish to accompany roasted chicken! Having multi-purpose ingredients on hand allows for easy improvisation!
9. Stock your pantry: A well stocked pantry is a chef’s secret arsenal (Alice Waters has a whole book devoted to the subject), and this is doubly true for the prepper. There’s nothing worse than assembling your pre-prepped meal, only to realize that you’re out of oil, vinegar —you name it. My cant-live-without pantry items include: local olive oil, local honey, crunchy sea salt, sherry vinegar, capers, anchovies, thyme, cumin and fresh garlic and greens. (Those last two aren’t technically pantry items, but I find them indispensable).
10. Prepare and freeze one complete meal, lasagna, stew or enchiladas are great. Then when the unexpected occurs, you'll have a nutritious, homemade meal, ready to go!

Aubrey Yarbrough is the Community Development Manager for Farmer Mark. Before moving to LA she ran her own organic farm and cooked on the garde manger station of the award winning Elements restaurant in Princeton, NJ. She has contributed poetry to New American Writing and prose to Edible Jersey.